Some years ago I built Dave Clarkson’s Mini Slow (plan). It was a very strong airplane. I think I crashed it around about 10 times before the fuselage and tailplane finally gave up and shattered into several pieces. Remarkably the wing is still intact so sometime I’ll get around to building another fuselage and tail-plane for it. The broken pieces also showed what a crappy job I did in gluing the wing to the fuselage. There were quite a few gaps as evidenced by the intrusion of a fair bit of paint into the join. The lesson I’ve taken away for constructing the Midi Slow is to use epoxy rather than PVA to join the fuse to the wing.
Incidentally, the nose on the Mini Slow is quite short so I intend to make the replacement 1/2 an inch longer to better accommodate a commercial tank.
In the meantime I had started building 2 Midi-Slows, the plan for which had appeared in Aeromodeller in March 2018, it’s not a large or complex plane so I thought why not build two together? I intended to give one of them to another club member who’d commented sometime before that he wished he had something as strong as the Mini Slow but unfortunately he was struck down by ill health before I finished it and has ceased flying. At least I have a spare now.
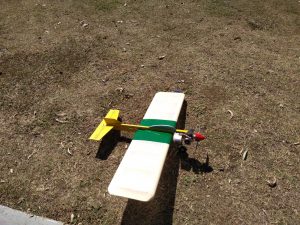
As suggested in Dave Cowburn’s Aeromodeller article I made a template cutter as I was building two. Another modification I made was to cover the ribs with Silkspan as a good lightweight way of adding strength. I found this suggestion in the article accompanying the plans of a combat model (an Ironmonger which I still haven’t finished). I also added a bellcrank stabiliser as suggested too.
I’m a digital subscriber to Aeromodeller and found that I had to do a lot of mucking about to get what I hope is an accurate print of the plan. Well, it isn’t really a plan as such but a couple of pages of diagrams and some full-size templates for some parts such as the wing ribs.
This is where I found some inconsistencies. For instance, the cut-out diagram for the parts suggests that the span of the tail-plane is 13 inches but from the plan printed on another page it is 12 inches. But as it’s not a precision stunter and I suspect it won’t make a big difference I opted for the one that was drawn on the plan which is still quite a bit bigger than the Mini Slow tailplane.
My suggestion for inexperienced scratch builders would be to get a pukka plan.
This is also the first time I tried building two supposedly identical models at the same time and despite my best efforts I found that parts that were supposed to be the same were slightly different so I ended up numbering the parts for each plane so that I wouldn’t lose track of which parts went with which plane.
Rather than use a bicycle spoke as a pushrod I used music (piano) wire. As I had used a Z bend and I was using a 2-inch Brodak nylon bellcrank which isn’t just a flat plate I found it better that the pushrod exits the wing via the top surface rather than the bottom and since the lead-out holes on the plan aren’t quite right for this bellcrank I ended up enlarging the holes in the rib nearest the bell crank. As this potentially weakened rib (E) I reinforced it a bit.
With regard to wingtip weights 3 x 2 pence pieces are suggested. According to Wikipedia, a 2 pence piece weighs 7.1 grams. As best I could estimate I used 4 large flat washers which I had bought for another plane that I estimated to be just about 6 grams each. I determined this by weighing all of them and dividing the number weighed.
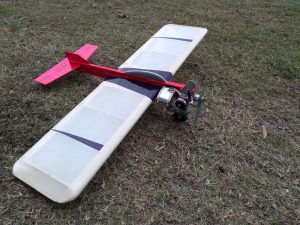
I always cover the solid surfaces (tailplane, fuselage, etc.) of my planes with Silkspan. This adds strength and better seals the wood. I think it is what helped my Mini Slow last so long. This is also the first time I’ve used Koverall which is easy to apply and shrinks to a drum-tight finish. In brief, I doped down the Koverall onto the wing frame. I didn’t worry too much about getting it too tight at this stage. Once I was satisfied that the covering had been securely attached to the frame I applied a covering iron set at about 130C which I used to shrink the covering before sealing it with 50/50 Dope/Thinner mix. I also found some bubbles on solid surfaces, these were easily shrunk away using the iron. Rather than shrinking one surface at a time, I did it wing bay by wing bay (top and bottom) to reduce the likely hood of the wing warping. Despite this precaution, I noticed that on one of the planes the wing had warped. Fortunately, this was easy to remove. I just twisted the wing against the warp and heated the surface I wanted to stretch. I’m pleased with the result.
When it came to finishing I spray painted the fuselages and tailplanes and I tried a technique which I discovered in 1967-68 Aermodeller annual. Briefly, it uses gummed paper and paint. The basic idea is to paint on to the gummed paper, glued side up, to make transfers which you then carefully cut to shape, remove the paper (in water like a transfer) and place on the outline of the shape you want to make, which you’ve drawn in pencil on your airplane, painting in the remaining area without the need to paint up to the edge of the outline. I’ll be writing another article about this technique. In the meantime, you can find the original here on page 91.
To fuel proof the models I sprayed the fuse and tail with Topflite Lusterkote (unfortunately no longer available.) I’ve used Lusterkote on nearly all my models and found it to be an excellent fuel proofer. As Lusterkote is fairly expensive I decided to fuel proof the wings with Bondall marine varnish thinned with about 10 to 15% of lacquer thinners. As per usual when using varnish I found it difficult not to get runs.
I also discovered that the pink paint (Dupicolor Hot Pink) I used to paint one of the models has very poor adhesion to Lusterkote (and it doesn’t seem to adhere too well to anything else either!) I discovered this by accident when I used some masking tape on the Lusterkote and it came away with the tape when I removed it. This is the first time I’ve had trouble with Lusterkote. I tested some varnish and it seems to adhere to the pink paint ok so I peeled off the Lusterkote, using the technique I had accidentally discovered using masking tape, and re-finished the model with varnish. To be honest it doesn’t look great but I won’t be entering it into any competition where appearance is judged.
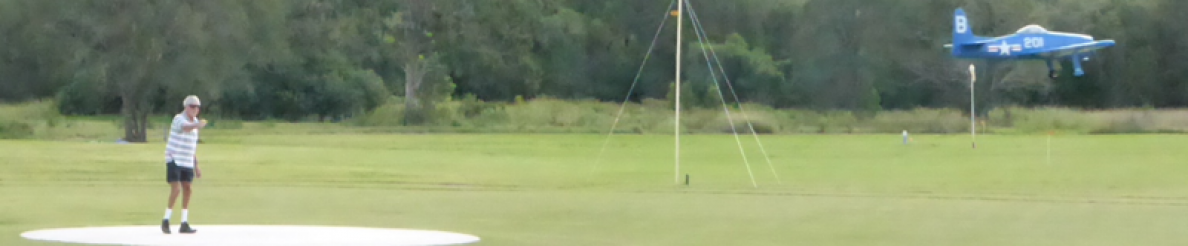
I finally finished it and flew it on 55ft lines on a calm winter day. The model is powered with an ASP 15 which is a great motor with fuel fed from a Brodak 2oz Uniflow wedge tank (part no. BH-588) which gives flights of over 6 minutes. This is an excellent combination and the motor never hesitated and I felt confident enough with it to try a lazy 8. I found it quite fast, but not too fast with excellent line tension. It was a bit twitchy, possibly because it has a huge elevator. On the second flight, I reduced the elevator throw but it didn’t seem to make much difference.
P.S. Unfortunately I crashed one of my Midi-slows not long after I finished writing this article it while trying a lazy 8 and just trying to hold model inverted a bit longer. Whilst the wing remained intact the nose broke off basically where the engine bearers join the fuselage. The position of this join is very near to the leading edge of the wing which I think made the nose quite weak at that point. I think a suitable improvement would be to either to lengthen the bearers by about 1 inch or if you constructed the fuselage as per plan using 4 1/2 inch sq strips then shorten the bearers so that they finish just about were the undercarriage is.
This is a personal preference but as I like to try to fly inverted holding my hand horizontal with my palm pointing up another useful modification would change the leadouts so that the down leadout is at the front. This (in theory) means that if you can’t keep up with the model whilst it is inverted then it should climb rather than dive.
